
This page exists to provide a basic overview to get started. Before actually installing, it can help to skim through the Frequently Asked Questions (FAQ), as well as to refer to the official installation guide at docs.alpinelinux.org.
Tip: This is a wiki!If something isn't correct, or is incomplete, you will have to figure it out, or ask for the correct solution in the community.
And then carefully edit the wiki page.
Just as those before who did it for you.
For architectures other than X86, refer to their respective pages:
The installation procedure for Alpine Linux requires basic understanding the three modes of running Alpine Linux i.e Diskless Mode, Data Disk Mode and System Disk Mode . The general course outlined below is common for all the three modes.
Note: It is really helpful for many cases to first complete the base configuration, then proceed with installation of the target system with any one of the various alternate courses of action.
Examples of preparation options:
Examples of proceeding options:
There are many more setup-scripts available. All these tools may also be run later to adjust specific configurations. For example, to set up a graphical environment as covered under Post-Installation below.
Alpine Linux can be installed and run in following three modes.
This means the entire operating system with all applications are first loaded into RAM and then only run from there. This is the method already used to boot the .iso installation images, however setup-alpine can also configure the installed system to continue to boot like this if "disk=none" is specified. The mode is extremely fast and can save on unnecessary disk spin-ups, power, and wear. It is similar to what other linux distributions may call a "frugal" install or boot into with a "toram" option.
Custom configurations and package installations may optionally still be preserved or "persist" across reboots by using the Alpine local backup tool lbu . It enables committing and reverting system states by using .apkovl files that are saved to writable storage and loaded when booting. If additional or updated packages have been added to the system, these may also be made available for automatic (re)installation during the boot phase without any (re)downloading, by enabling a local package cache on the writable storage.
[FIXME-1: Storing local configs and the package cache on internal disks still require some manual steps to have the partition listed, i.e. making a /etc/fstab entry, mountpoint, and mount, *before* running setup-alpine. The linked workaround also still requires to commit these configurations to disk manually before rebooting.]
If a writable partition is available, setup-alpine can be told to store the configs and the package cache on that writable partition. (Later, another directory on that same partition or another available partition may also be mounted as /home, or for example, for selected important applications to keep their run-time and user data on it.)
The boot device of the newly configured local "diskless" system may remain the initial (and possibly read-only) installation media. But it is also possible to copy the boot system to a partition (e.g. /dev/sdXY) with setup-bootable .
This mode also runs from system RAM, thus it enjoys the same accelerated operation speed as "diskless" mode. However, swap storage and the entire /var directory tree get mounted from a persistent storage device (two newly created partitions). The directory /var holds e.g. all log files, mailspools, databases, etc., as well as lbu backup commits and the package cache. This mode is useful for having RAM accelerated servers with variable amounts of user-data that exceed the available RAM size. It enables the entire current system state (not just the boot state) to survive a system crash in accordance with the particular filesystem guarantees.
[FIXME-2]: Setup-alpine will create the data partition and mount it as /var, but setup-alpine's "data" disk mode can not yet configure lbu config storage settings automatically. The current workaround, is to select "none" at the 'where to store configs' prompt (as the new data partition is not listed anyway) and configure lbu manually after setup-alpine exits, and before rebooting:
In data disk mode, the boot device may also remain the initial (and possibly read-only) installation media, or be copied to a partition (e.g. /dev/sdXY) with setup-bootable .
This is a traditional hard-disk install. If this mode is selected, the setup-alpine script deletes the existing partitions and creates three partitions on the selected storage device, /boot , swap and / (the filesystem root). This mode may, for example, be used for generic desktop and development machines.
Refer #Custom partitioning of the harddisk, if you do not want to use entire disk for Alpine Linux.
Note: This "Additional Details" section needs to be consolidated with the work at https://docs.alpinelinux.org (not finished) (Restructuring things there, moving and linking from here or there?).
Download the proper stable-release ISO installation image-file for the target computer's architecture with their corresponding sha256 (checksum) and GPG (signature) files.
| OS type | SHA256 check | SHA256 calculation (to be compared manually) | GPG signature verification |
|---|---|---|---|
| Linux | sha256sum -c alpine-*.iso.sha256 | curl https://alpinelinux.org/keys/ncopa.asc | gpg --import ; |
gpg --verify alpine-.iso.asc alpine-.iso
Under Unix (and thus Linux), "everything is a file" and the data in the image-file can be written to a device or media with the dd command. Afterward, executing the eject command removes the target device from the system and ensures the write cache is completely flushed.
Be careful to correctly identify the target device as any data on it will be lost! All connected "bulk storage devices" can be listed with lsblk and blkid .
# lsblk NAME MAJ:MIN RM SIZE RO TYPE MOUNTPOINT sdX 0:0 0 64,0G 0 disk ├─sdX1 0:1 0 2G 0 part └─sdX2 0:2 0 30G 0 part /mnt/sdX2 # blkid /dev/sdX1: LABEL="some" UUID=". " TYPE="vfat" /dev/sdX2: LABEL="other" UUID=". " TYPE="ext4"
For example, if /dev/sdX is the desired target device, first make sure you un-mount all mounted partitions of the target device. For example sdX1 and sdX2:
umount /dev/sdX1 /dev/sdX2
For dd 's output-file ( of= ), do not specify a partition number. For example, write to sdX, not sdX1:

Warning: This will overwrite the target device /dev/sdX, so before executing, make sure you have a backup of the data if you can't afford to lose it.
# dd if=~/Downloads/alpine-standard-3.00.0-x86_64.iso of=/dev/sdX bs=4M; eject /dev/sdX
For example, there is the Rufus program. Rufus will enable you to create bootable USB flash drives under Windows.
Rufus has been tested and works for Alpine Linux 3.12.x with the following settings:
After detaching and re-attaching the device, a bit-wise comparison can verify the data written to the device (instead of just data buffered in RAM). If the comparison terminates with an end-of-file error on the .iso file side, all the contents from the image have been written (and re-read) successfully:
# cmp ~/Downloads/alpine-standard-3.00.0-x86_64.iso /dev/sdX cmp: EOF on alpine-standard-3.00.0-x86_64.iso
Insert the Installation media to a proper drive or port of the computer and turn the machine on, or restart it, if already running.
Note: To successfully boot and install Alpine Linux, disable secure boot in the BIOS. Once Alpine Linux is installed, this can be enabled.
If the computer does not automatically boot from the desired device, one needs to bring up the boot menu and choose the media to boot from. Depending on the computer, the menu may be accessed by repeatedly pressing a key quickly when booting starts. Some computers require that you press the button before starting the computer and hold it down while the computer boots. Typical keys are: F9 - F12 , sometimes F7 or F8 . If these don't bring up the boot menu, it may be necessary to enter the BIOS configuration and adjust the boot settings, for which typical keys are: Del F1 F2 F6 or Esc .
The boot process of the alpine installation image first copies the entire operating system into the RAM memory, and then already starts a complete Alpine Linux system from there. It will initially only provide a basic command line environment that does not depend on reading from any (possibly slow) initial boot media, anymore.
Local log-in is possible as the user root . Initially, the root user has no password.
At the command prompt, an interactive script named setup-alpine is available to configure and install the initial Alpine Linux system. Launch the Alpine Linux Installation by running the setup-alpine script :
The question-and-answer dialog of setup-alpine takes care of the base configuration.
It allows to configure the system to boot into one of three different Alpine Linux "disk" modes: "diskless"(none), "data" or "sys".
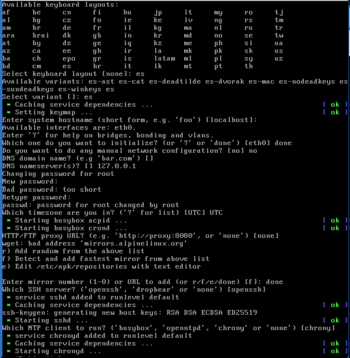
The setup-alpine script offers the following configuration options:
Base configuration is complete with the above step. Refer to the alternate courses of action to proceed further.
At the end of base configuration instead of answering none for the above prompts, the Sys Mode or traditional hard-disk install of Alpine Linux can be completed. However, this mode requires an entire hard disk for Alpine Linux.
The scripted installation creates three partitions on the selected disk, for /boot, swap and / (filesystem root). If a non-empty disk is chosen, existing partitions are deleted before the partitions are created.
If you do not have a dedicated Hard disk for Alpine linux, you have to follow custom partition or refer to alternate courses of action to proceed further.
Warning: If "sys" mode is chosen in the next step, the data on the chosen device will be overwritten!
Now the script will complete system disk mode installation of Alpine Linux on the chosen disk. Once the traditional hard-disk install of Alpine Linux is complete, you can reboot the system to start using it.
Refer Setting up disks manually page for specific configurations related to RAID, encryption, LVM, etc. as well as to manually partition the harddisk.
For "diskless" or "data disk" mode installs, manual partitioning may be needed to prepare the harddisk for committing local backups of the system state with lbu commit , to have a place for a package cache, or to use it for a /var mount.
For a "sys" install, custom partitioning is needed only if the desired scheme differs from overwriting an entire disk, or using the default set of a /boot, swap and root partition on the disk.
If setup-alpine has finished configuring the "sys" disk mode, the system should be ready to reboot right away (see next subsection).
If the new local system was configured to run in "diskless" or "data" mode, and you do not want keep booting from the initial (and possibly read-only) installation media, the boot system needs to be copied to another device or partition.
The target partition may be identified using lsblk (after installing it with apk add setup-bootable
Once everything is in place, save your customized configuration with lbu commit before rebooting.
First, remove the initial installation media from the boot drive, or detach it from the port it's connected to.
The system may now be power-cycled or rebooted to confirm everything is working correctly.
The relevant commands for this are poweroff or reboot . Login into the new system with the root account.
The installation script installs only the base operating system. No applications e.g. web server, mail server, desktop environment, or web browsers are installed.
Please look under Post-Installation below, for some common things to do after installation.
Custom-made headless apkovl can be done by first booting the install media on some computer with a display and keyboard attached, or in a virtual machine, and doing an intermediate "diskless" setup of just the boot media (more details below), i.e. using the offical setup-alpine to configure the system's network, possibly for dhcp if needed, a ssh server, and a login user. Choosing "disks=none" for now, yet, configure to store configs on the boot media (if it is writable, otherwise on a separate storage media). And afterwards calling lbu commit to store the configs as local backup. Then your completed setup, including its securely created own private keys, will readily get (re)loaded on every subsequent (headless) boot from your custom-build .apkovl.tar.gz stored on the boot media (or on an auxilary media or server location, in case the boot media is read-only).
Note: Specific topics should be kept on separate, individually manageable topic-pages and only get listed with a direct reference (link) on this general page.
Tip: Alpine Linux packages stay close to the upstream design. Therefore, all upstream documentation about configuring a software package, as well as good configuration guides from other distributions that stay close to upstream, e.g. those in the ArchWiki, or Gentoo wiki are to a large degree, also applicable to configuring the software on Alpine Linux, thus can be very useful.
Many people think that Alpine is only made for containers and servers, but it is actually a general purpose distro which can definitely be used as a daily driver.
Alpine is extremely small, simple and resource-efficient, making it easy to customize.
Note: This guide assumes you have already installed a minimal Alpine system by following the Installation guide
Topics not strictly related to using Alpine Linux as desktop are listed below: